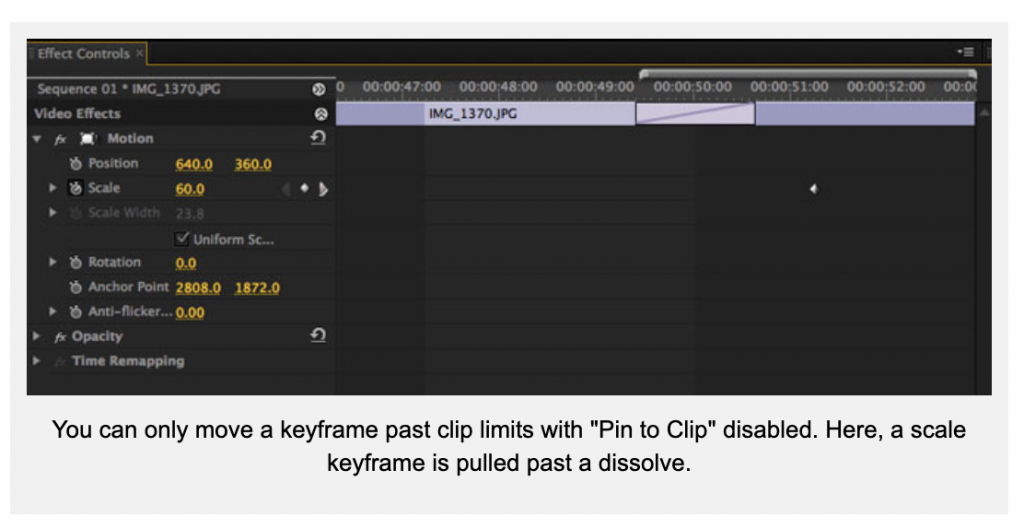
A few years ago, editor Carl Schuubiers had a question about keyframe placement during a dissolve. Carl was dissolving between two photos being moved “Ken Burns style” with Position and Scale keyframes. He had no trouble when doing the original moves by placing the keyframes at the very edges of the clip. However, when he added a dissolve to a motion control move like this, he could see the outgoing clip stop and the incoming clip start during the animation. Carl didn’t want this. What he wanted to do was place the keyframes placed outside of the dissolve, so the viewer couldn’t see stops and starts, making the animation appear smoother and more seamless.
There is only one problem with the idea of placing keyframes outside of the dissolve. By default, you can’t move the keyframes beyond the clip limits in the Effects tab of the Source panel. So how do you move keyframes outside the clip limits so that you could achieve a smooth motion control move?
Fortunately Ann Bens, Premiere Pro editor extraordinaire had this to offer, “Uncheck Pin to Clip” in the panel menu in the upper right area of the Source Monitor. This will give you room to adjust the keyframes in the Source panel. Great! Now you have access to keyframes outside the clip’s limits and can place them just where you want.
To add to Ann’s advice, adjust the magnification in the Effects tab of the Source panel in the lower left corner of the Effects tab so that you can see beyond the clip’s limits and then will be able to manipulate the keyframe as you see fit.
Adobe Premiere Pro documentation on Pin to Clip is here.
While working in certain applications which use the GPU for processing data, do you have trouble with your computer shutting down? No errors, no freezes, just shutting down? We have been seeing a few cases in support where customers are complaining about this. In doing some troubleshooting, we have found that it’s sometimes due to hardware issues related to internal hardware components.
Does your computer shut down right away, or soon after you started working? It is likely that you don’t have a large enough power supply unit (PSU) to handle the power consumption of the GPU. In fact, the GPU is definitely a resource hog when comparing it to other hardware components. With the literature that comes with each GPU is its power consumption. Make sure you take into account the added power your system will require when adding a new GPU. In many cases, you will need a newer, more powerful power supply. For more info, see this link: http://en.wikipedia.org/wiki/Power_supply_unit_(computer)
If your computer shuts down after working with your applications after awhile, it might be due to inadequate cooling within the computer, exceeding the operating temperature limits. If the system gets too hot, heat emitting components like the CPU, hard drives, GPU, etc., might cause your computer to shut down. When adding a new hardware to your computer system, keep in mind the waste heat the components will emit. If this is the case, look into ways to cool the internal components of your computer down. See this article for an explanation: http://en.wikipedia.org/wiki/Computer_cooling
Getting a low-level exception occurred in Adobe Player (Player: 5) warning? Media Pending? Searched and found a thread about a similar error on (Player: 60). Confusing! What’s going on here?
Answer: Bug on Legacy Titler. You need to roll back to 14.0.4, use Software Only mode in Project Settings > General (not recommended-slow!), (unofficially, I can also suggest) install and use the Premiere Pro public beta, or finally, wait for the update (coming shortly).
Inside scoop: a fix is coming in an upcoming version of Premiere Pro, so do not fret.
Next: never, ever, ever, never, ever, use any tool called “Legacy.” If you have not yet heard this from Adobe, for the love of all that is holy: Stop Using Legacy Title!
To explain further, a bug in Legacy Titler from Premiere Pro (14.1) caused a lot of problems for a lot of editors still using Legacy Titler.
Why did this happen? Well, bugs happen—especially in those obvious places like obsolete tools. That’s why “Editor Kevin” suggests you avoid such tools.
That said, some are not even aware of the Essential Graphics panel or its associated titling tools. Is that you? If so, here’s some documentation to check out.
Others simply do not like the new tools (Hey! Old habits die hard!). Many prefer the simplicity of Legacy Titler over the newer tools. Others indicate that the new title tools do not fully replace every feature of Legacy Titler.
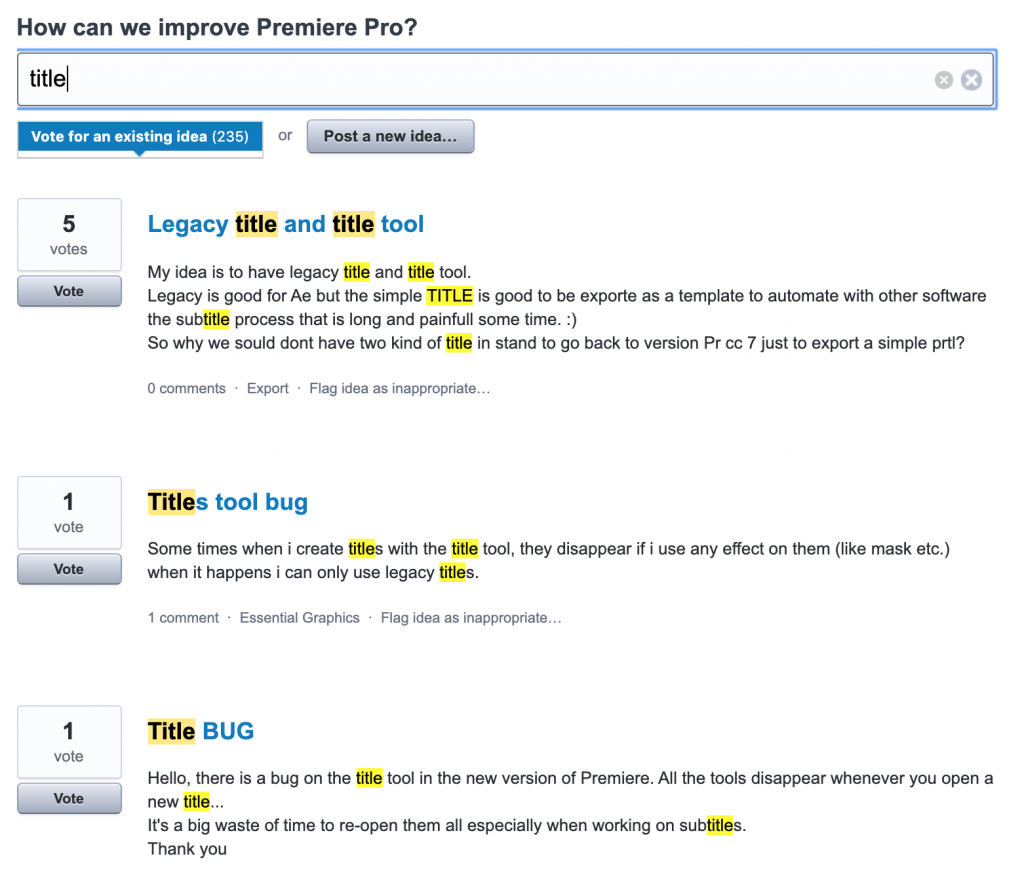
If you are against using the new tools altogether, the best place to give that feedback is on the User Voice channel. I just typed in “title” to the search and located the request most suitable for an upvote.
Whatever your reasons are to holding onto this dinosaur of a title tool, any tool labeled obsolete or legacy is removed from any NLE product at some point, so the advice is to begin moving away from these kinds of tools. Product Teams worldwide try to provide you at least one obvious hint that this thing is going away. In theory, use older tools only to restore legacy projects. Use any obsolete or legacy tools with extreme caution for a variety of workflow breaking reasons.
Again, the issue is fixed in an upcoming version of Premiere Pro. Once available, if you update to solve this issue, make sure to clear that media cache!
You can’t drag a clip to the Timeline in Premiere Pro. Frustrating. Maybe you dragged the first clip into the timeline successfully, but attempting to drag the second clip in fails. Maddening! Sometimes you can drag in video, but cannot drag in audio. Other times you can drag in audio but the video doesn’t follow. What’s going on here?
The issue is that you are using a two step process to drag clips into the Timeline. The actual process requires 3 steps.
Process for dragging clips into the Timeline successfully.
LOAD: Select the clip in the Project panel (or double click to load into the Source Monitor).
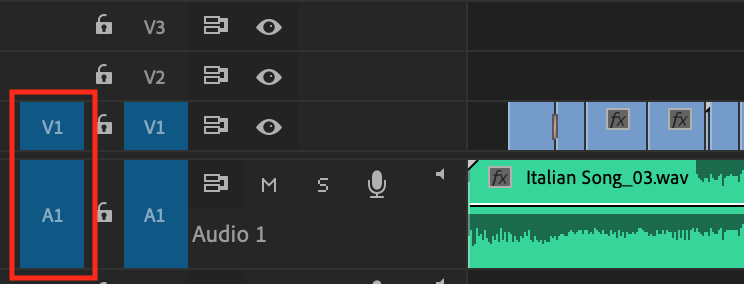
PATCH: Look down at the Track Header at the left of the Timeline. Make sure the V1 and A1 Source Patchers (blue boxes) are patched to the track you intend to drag it to. All 4 blue boxes should be enabled.
EDIT: Drag the clip to the Timeline from either the Project panel or the Source Monitor to the Timeline.
The clip is now edited to the track you intended (V1 and A1, shown here).
The blue boxes at the far left are the vital V1 and A1 Source Patchers
Some commentary from my experience as an editing instructor:
Many newer editors simply drag from the Project panel to the Timeline with no knowledge of the vital step, Step 2, so failure is high.
If you don’t know about Step 2, you may fail in step 3.
The mantra: “ENABLE SOURCE PATCHERS BEFORE YOU DRAG”
The interim step of loading the clip into the Source Monitor by double clicking it from the Project panel prevents that failure with automatic source patching.
Newer editors tend not to preview the clip in the Source Monitor, skipping a conventional editing process. An editor should load a clip into the Source Monitor for many reasons. Why should you want to do this?
Loading the clip into the Source Monitor provides you a quick view of the clip before committing it to your program.
This allows you to mark the clip’s In and Out points ahead of time, so less timeline trimming is required.
Playback in the Source Monitor allows for a quick quality and performance check of the audio and video.
Automatic Source patching is more robust here, as mentioned.
For those unaware of Step 2, selecting the clip in the Project panel should also automatically set up Source Patching, except it does not work with 100% reliability. The editor must ensure that.
Automatic Source Patching can fail with certain files like screen captured H.264 and other Long GOP files. It’s better to load it into the Source Monitor as a failsafe, then look down at your patching.
Welcome to my Adobe Premiere Pro 101 series. This article is the first in a series I am planning to help newer editors fill in important gaps of knowledge.
I’m going to advise you that (unofficially) it’s time to begin moving off macOS 10.11 and Windows 7.
A good number of support issues can be solved by simply updating your OS.
I know there is reluctance to move off these versions of the OS (especially you WIN 7 hardcores), so I do understand. These versions of the OS are still supported, however, you may encounter unexpected behavior if you continue to use them.
It may be time to “have that talk” with the IT guy if you are in an enterprise environment.
I created 4 videos describing the new features in Premiere Pro CC (2018) 12.1 recently. Give ’em a like or, better yet, subscribe to the channel. Leave comments in the comments area on YouTube.
Hello video editor. You’ve been working with QuickTime files for years, more than likely. You have either like it (Mac aficionado) or you hate it (PC stalwart), but either way, not much has changed and you’ve had a working relationship with it for some time now.
Times have changed. As of January 2018, Mac-based applications can no longer support 32-bit QuickTime files. This includes a good number of non-linear editing systems, including Premiere Pro. macOS High Sierra is the last OS that will support 32-bit QuickTime files. Read the announcement Apple made on the topic here.
Fortunately, companies like Adobe have been preparing for this moment by writing their own 64-bit QuickTime Libraries so that certain formats (like ProRes) can live on. That said, not every legacy QuickTime wrapped codec has been restored. I’m already seeing those with archives of QuickTime files that are no longer recognized by Premiere Pro CC (12.1) which has zero support for 32-bit QuickTime files.
For Adobe applications, here is the list of supported codecs:
Native Video Import:
DNxHD/DNxHR
JPEG
PNG
ProRes
Cineform
DV
AVCI
h.264
IMX
MPEG2
HDV
HEVC
XDCAM
Uncompressed
Animation (without delta frames)
Native Audio Import:
Uncompressed
AAC
AC3
Native Video Export:
Uncompressed
DV
Cineform
DNxHD/DNxHR
Animation
ProRes (Mac only)
Native Audio Export:
Uncompressed
Take a look at this list and see if any of the codecs you use might not be on the list. For example, if you work with .avi files, you might be out of luck. My advice is to transcode this footage to a 64-bit supported version of the file using an appropriate intermediate codec of your choice: ProRes, DNxHD/HR, or Cineform so that you can edit with these files moving forward.
More info and advice on this topic is coming soon.
Prior to coming to Adobe, I was a freelance editor. I also did my fair share of training. One piece of advice I’d always give to students was to make sure that you always “protect” your project files. By protect, I am talking about the subject of updating and backing up current project files.
Updating project files
With new versions of Premiere Pro CC becoming available (or with any NLE, really), you will be facing the decision of whether to update your project files to the new version or not. So what should you do?
In general, the rule of thumb is to avoid updating current project files to major new versions of Premiere Pro (and Premiere Pro CC will soon be updated to a major new version). Complete these large projects before beginning new projects.
Stay in current versions of Premiere Pro CC until your projects are complete. Begin only new projects in new versions of Premiere Pro CC.
In fact, a good number of careful post pros probably will hold off beginning new projects until a “bug fix” update is released subsequent to the new version.
Why avoid an update? By merely updating a project file, you might experience unexpected behavior, have bad performance problems, or even corrupt your project after updating project file versions mid-project.
I paid for the update through my Creative Cloud subscription, why shouldn’t I update like all CC users of Adobe apps?
Video editors are in a bit of a jam in this regard. On one hand, we’re the biggest users of Creative Cloud since we rely on so many applications: Premiere Pro, After Effects, Photoshop, and Audition at a minimum. On the other hand, we have to be careful with updating practices since we have so many interdependent pieces to our workflows, related to both software and hardware. One small thing not working right can bring the entire workflow down. As editors, we have to face facts that we must tread carefully, even though shiny new versions of our software are frequently offered up.
My general advice is to avoid updating project files that are large, complicated, contain multi-camera sequences, or a lot of media objects (clips, graphics, audio, other media). Feature films, and documentaries are prime examples of project files that you should probably avoid updating. In general, the more complicated a project is, the more likely things might go wrong after updating it.
When should I deploy a new version of Premiere Pro?
If you are curious about the new features, (or you absolutely need to open an existing project in the new version), by all means, install the new version of the application as soon as it is available. My advice is to first try it out with a fresh project file other than your legacy project first.
Since you now have both the new and the legacy versions of your NLE installed side by side, you can preview new features in this test project without disturbing your current project.
Forced to update? One way to update your project safely
What if you do absolutely need to update your project then?
These days, I don’t update the project file by opening into the new version. Instead, I create a new project and import the legacy project into that project.
Some users have reported that importing a CC project (via File > Import or the Media Browser) into a new CC project works fine, but try this with a duplicate of your project and see if it works for you.
If you must update a complex project because of a bug fix or a feature that you absolutely must have, proceed with caution (and several backup projects in hand). If things do go wrong on the updated version of the project, you can always return to a fairly recent backup project.
The Default Method of Updating a Project
If you have the new version of Premiere Pro installed, and you attempt to open a legacy project in this new version, the Convert Project dialog box will convert your project to a new copy of the project with the benefit of leaving your existing project in place by default. One word of caution, however. Do not replicate the name of the project, click OK, and then click through the “Project Name already exists. Do you want to replace it?” dialog box. If so, you’d essentially be updating your project file with no backup file.
The Convert Project dialog box increments and creates a new version of your project file.
You can update simple projects in this fashion without issues, usually. It’s up to you if you want to try it, as I’d still recommend creating a new project and importing any legacy project into it.
What happens if a complicated project file is updated in this fashion? Hopefully, nothing. However, the potential of things that might go wrong with an updated project file that is complex are numerous. Corruption and unexpected behavior are at the top of that list. Sometimes these behaviors don’t crop up after working on the updated file days, or even weeks later. Why risk it? Bottom line: don’t update a project file to a major new version unless absolutely necessary. If you must, you already know the method of import I prefer and recommend.
Backing up project files
Some tips can help you manage and back up these project files.
Keep the project updated by choosing File > Save frequently, especially after major edits have been made.
After saving a project, store different versions of project files in representative folders.
Clearly name project files and appended them with time and date stamps
Label (color code) your project files at the OS level
Enable Auto Save in Auto Save preferences, ensure that it is working according to your expectations by testing the operation.
Enable the “Save backup project to Creative Cloud” function in Auto Save preferences.
Duplicate your existing project file at the OS level or by using “Save As” at least three times a day
This ensures that you have backup project files in addition to your Auto Save files.
Copy these project files to a few different locations, including online, for safekeeping.
Managing versions of project files is a somewhat painful, but necessary part of the job as a video editor. I look at the task as protecting the project file at all costs. After all, it represents the sum total of all the hours, days, and weeks spent on the project.
Please leave any questions or ideas in the comments section.
When behavior in After Effects does not seem as expected, you can reset After Effects preferences as a simple troubleshooting step. From After Effects Help:To restore default preference settings:
Press Ctrl+Alt+Shift (Windows) or Command+Option+Shift (Mac OS) while the application is starting.
A dialog box launches asking you if you want to delete your preferences file. Click OK.
To also restore default keyboard shortcuts, Alt-click (Windows) or Option-click (Mac OS) the OK button.
Some personal notes:
After you delete preferences, new preferences are automatically rebuilt for After Effects.
Note: since you have deleted the preferences file, you may have to reset some of your preferences.
For terminology’s sake, resetting preferences, deleting preferences, trashing preferences, or simply, “trashing your prefs,” all mean the same thing.
Resetting After Effects preferences has gotten me out of many jams. Try it if After Effects is misbehaving.
I am so glad I employ the smart rendering workflow as often as possible when working in Premiere Pro, especially for the exporting process.
I think that many editors get themselves into a jam too often at deadline when changes are afoot and mistakes are uncovered when exporting. Found a mistake while watching down your show? Then you’ll be forced to “redo” that export. This. Takes. Time. Time that you probably don’t have. Then the stress level starts going up, does it not?
Let’s say you’re cutting H.264 that you acquired from your mobile phone or camcorder (as you are probably used to doing) instead of native or transcoded ProRes, DNxHD/HR or Cineform footage which you can make happen on ingest. Since you are not employing a smart rendering workflow, you are subject to wasting a lot of time. You are time-penalized by making the fix, then, on export, you need to process any effects and re encode the entire piece, usually to H.264. Talk about a drain on your time.
What if you caught another mistake on a second watch down? That’s right, you have to sit through the entire exporting process once more. Painful. There is a better way.
If you are cutting like I do, with ProRes, or any of the other smart rendering aware codecs, just make the fix—re render the preview—then export once more. The ProRes codec export is much, much faster than waiting for another H.264 export since you are merely copying preview files into a new container rather than re processing and re encoding the entire contents of your timeline: you’re using smart rendering in this scenario. This may only take a few minutes compared to the better part of an hour or more.
With this “master” file, you can create H.264 copies at high quality. If you are uploading to YouTube, Vimeo or other service, you can usually upload the original master. This takes longer, but results in higher quality video for your audience.
Smart Rendering: Is it worth your time?
Though it took you some time to prep your material, and filled up your drive space with preview files and transcoded video files, I believe you are saving yourself time in the long run, especially during the exporting process, and particularly if there are changes that are required after you have already exported for the first time.
Furthermore, you get fewer errors on export (error compiling movie, etc.) since much of the computer processing required for processing effects, especially GPU accelerated effects, have already been back loaded to your preview files.
Of course, the time it takes in rendering previews comes into play when you consider overall exporting time, but hopefully you off loaded that during breaks you took while editing, not while you are awaiting an export on “bated breath.”
I don’t know about you, and maybe I’m just getting older, but I find a ton of mistakes on watch down, and never catch all of them at once (blasted typos on lower thirds!). For me, this sometimes requires several attempts at exporting a program. With smart rendering, this iterative process goes much faster and that satisfies my perfectionist tendencies.
Devices like the Atomos Shogun Inferno can help you record to smart rendering capable codecs
Smart Rendering Basics
Don’t yet know the basics of smart rendering? Basically, to employ smart rendering you need to do the following:
Before Editing:
Transcode any Long GOP footage to ProRes, DNxHD/HR, or Cineform during ingest or prior to importing the footage (see this article which shows you how to ingest media automatically in the background while you begin editing).
You can also capture this footage natively to these codecs while shooting with certain cameras or recording systems (Atomos devices, etc.). It turns out that a lot of recent camera formats are available for smart rendering, including certain flavors of XDCAM. More info here.
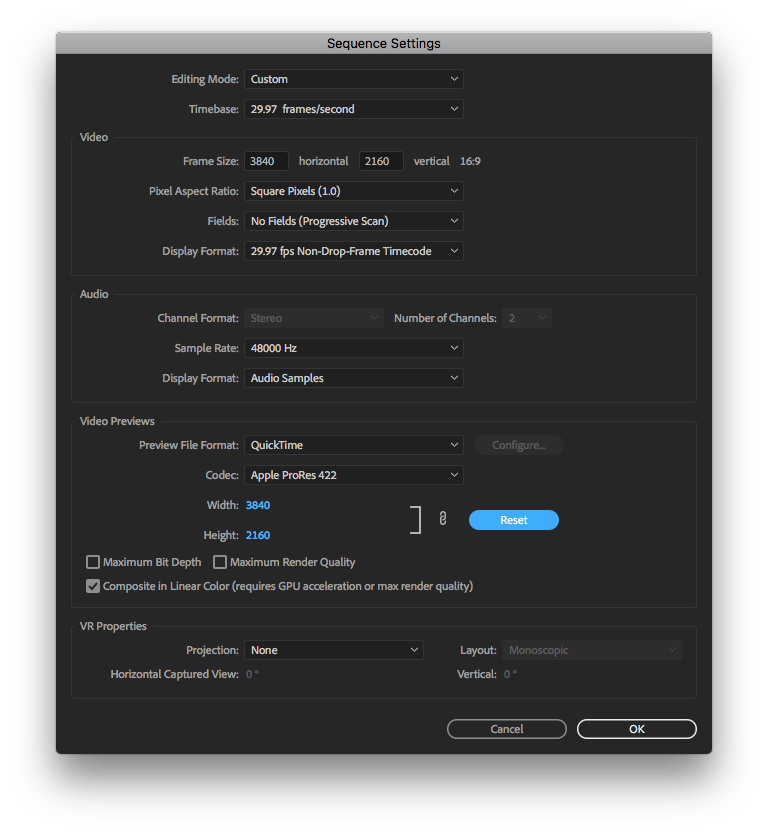
Change your Sequence Settings to create Preview Files using the same codec you transcoded to or captured your original footage to.
Choose Sequence > Settings, then set Editing Mode to Custom. This “unlocks” the ability to change settings for Preview files.
For Preview Files, change settings to match to the footage’s codec settings precisely.
Sequence Settings with new settings for Preview files set to ProRes
While you are editing:
Render any clips you have added an effect to whenever you get a free moment, ideally when you are taking a break.
Render the entire timeline before attempting to export.
Before exporting:
Change settings to export to the same codec you ingested and set previews to in the Export Settings dialog box.
Check the “Use Previews” checkbox in the Export Settings dialog box, as well. This ensures you are merely copying files rather than processing and encoding the files.
I should also point out that it is a much nicer editing experience when cutting with ProRes or the like, over Long GOP footage like H.264 or AVCHD. You drop fewer frames, and can view in a higher resolution with these intraframe codecs. You can even create proxies for them if you have an underpowered computer system and need better fluidity when editing.
A Hybrid Workflow for Smart Rendering
If you are under certain constraints, you can cut a few corners regarding employing the smart rendering workflow. Consider the following:
You do not have the time (or drive space) to transcode.
You didn’t have the right device to acquire smart rendering footage on location.
You created proxies from the Long GOP footage and plan to cut with those.
You can edit Long GOP footage acceptably with your computer and don’t want to go through the hassles of setting up a pure smart rendering workflow.
A combination of all these things.
If you find yourself in one of the above situations, you can still use a portion of the smart rendering workflow, however, you may spend more time and drive space overall for previews.
Essentially, the hybrid workflow consists of:
Cutting with Long GOP footage.
Setting up Sequence Settings to render previews in a smart rendering codec (see Smart Rendering Basics for the technique)
Render the entire sequence prior to exporting.
Export to the same codec you set for rendering previews. Don’t forget to check the “Use Previews” checkbox for the fastest possible exports.
YouTuber “EposVox” uses this workflow. See this video for his explanation how smart rendering has improved his editing outlook.
Epilogue for Smart Rendering
I hope that you can try the smart rendering process for your own projects. Let me know in the comments below if you have further questions. Good luck on all your projects.